How to Customize a Control in LabVIEW
How to Customize a Control in LabVIEW
Make a Microsoft Style Exit Button
By Marcus Benghts

Have you ever felt that the controls and indicators in LabVIEW’s standard palette do not fit in with your application’s looks? That you would like to go beyond the standard LabVIEW palette and design your own controls and indicators for your LabVIEW application?
Customizing controls in LabVIEW is quite simple – if you know where to begin.
As a simple example, let’s try to replicate the looks and behavior of the Exit Button in a typical Microsoft Office Application.
- First let’s open LabVIEW and create a new Type Definition.
- Place an NXG-style Text Button in the Type Definition.
- Press the “wrench” icon to switch to the Customize Mode.

In this mode a few more options show up, which allow you to customize the looks of the Type Definition.A button consists of up to six Picture Items corresponding to different button states. Each picture can be replaced by a custom image. The NXG Text Button has six Picture Items which are combinations of the button’s boolean state, whether the mouse is hovering over the control, and whether the mouse button is pressed.

4. For the Microsoft Office-like Exit button, we need three pictures. The pictures are saved as .jpg files with a 100×100 pixel sized canvas. I have created mine using GIMP – GNU Image Manipulation Program, but other image creating tools may be just as good.
5. Right-click on the button control and select the Picture Item corresponding to the state you would like to change picture for.
6. Right-click on the button control and press Import from File… and select a suitable picture file.
7. Repeat 5. and 6. for all Picture Items you would like to change.
8. Go back to Edit Mode by pressing the “tweezers” icon.
9. Rename the button label “ExitButton”.
10. Right-click on the button control. Hide the Label and Boolean Text by deselecting them under Visible Items.
11. Save as *.ctl file.
That’s it!
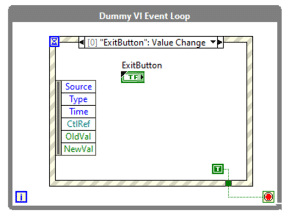
Next, just place the Type Definition in a VI, add an event loop, and enjoy your custom Microsoft Office-like Exit Button.